Table of Contents
Introduction
A window privacy screen is a removable or permanent barrier applied to a glass surface that blocks outside visibility while allowing natural light to enter your home. These solutions range from adhesive window film to physical fabric panels, giving homeowners and renters flexible options for enhancing home privacy without sacrificing the bright, welcoming atmosphere that windows provide.
This guide covers both temporary and permanent privacy solutions for residential windows, including films, physical screens, and DIY options. Whether you’re a homeowner looking to add privacy to ground-floor windows, a renter seeking damage-free solutions for bathroom windows, or a DIY enthusiast wanting to create custom screens for your own home, you’ll find practical guidance here. Understanding your options matters because the right privacy screen can transform a space—blocking prying eyes from the world outside while maintaining the light and openness that make a room feel comfortable.
Direct answer: Window privacy screens enhance home privacy by obscuring views from the outside while allowing natural light to enter, using materials like static cling films, adhesive films, or physical barriers made from fabric, wood, or plastic.
By reading this guide, you’ll learn:
- How different privacy screen types function and which suits your needs
- Installation techniques for film and physical screen options
- Energy savings potential—window privacy films can reduce cooling costs by rejecting up to 80% of solar heat
- Solutions for common challenges like nighttime privacy and air bubbles
- Maintenance tips to keep your privacy screens looking brilliant for years
Understanding the Window Privacy Screen
A window privacy screen is any physical or film barrier applied to glass surfaces that blocks visibility from outside while maintaining interior light transmission. These screens serve multiple functions beyond privacy: they reduce glare, protect furniture from UV fading, and can even lower energy bills. Most privacy films allow natural daylight to enter while blocking prying eyes, striking a balance between openness and seclusion that curtains or blinds often can’t achieve.
The primary function of any privacy window solution is controlling who can see into your space. Unlike traditional window treatments like blinds or curtains, privacy screens maintain a consistent appearance from the outside and don’t require adjustment throughout the day. They work by either reflecting light (creating a mirror effect), diffusing it through textured surfaces, or completely blocking transmission.
Static Cling vs Adhesive Privacy Films
Static cling films are removable privacy window film options that adhere to glass using static electricity rather than adhesive. Static cling films can be used by renters as they require no adhesive and can be removed without leaving residue. This makes them ideal for temporary installations, seasonal use, or anyone who wants the flexibility to change their window treatments without commitment.
The connection to your privacy needs is straightforward: if you’re renting or unsure about permanent solutions, static cling offers the same visual privacy as adhesive options without risk. These films typically have a shorter lifespan than adhesive versions—edges may peel or lift in high humidity—but the trade-off is complete reversibility. You can purchase, install, and remove them without special tools or landlord approval.
Adhesive privacy films use pressure-sensitive backing that bonds permanently to glass. They deliver superior durability, tighter optical clarity, and often include advanced features like ceramic particles or metallic layers that provide better heat and UV rejection. Window privacy films can block up to 99% of harmful UV rays, protecting your furniture, flooring, and artwork from sun-induced fading. However, adhesive films require more precise installation and may leave residue or damage seals if removed improperly.
Physical Privacy Screens
Physical privacy screens are rigid or semi-rigid barriers made from fabric, wood, plastic, or metal materials. Unlike film applied directly to glass, these screens mount in frames, on tracks, or as standalone panels positioned near windows.
Physical screens work best when film isn’t suitable—for example, on glass doors with historic value, windows with compromised seals, or situations requiring total light blocking. They offer excellent durability and can provide thermal insulation that films cannot match. Top-down/bottom-up shades provide versatility by allowing light in from the top while covering the bottom of the window, giving you control over exactly how much privacy and light you need at any moment.
The trade-off with physical screens is light reduction and bulk. While fabric panels can range from translucent to complete blackout, they generally block more light than films and require more space for installation. Understanding these distinctions prepares you for choosing specific types based on your room’s needs.
Types of Window Privacy Screens
Building on these foundational categories, let’s examine specific privacy screen varieties and their ideal applications. Each type offers distinct advantages depending on your privacy requirements, aesthetic preferences, and the specific room you’re treating.
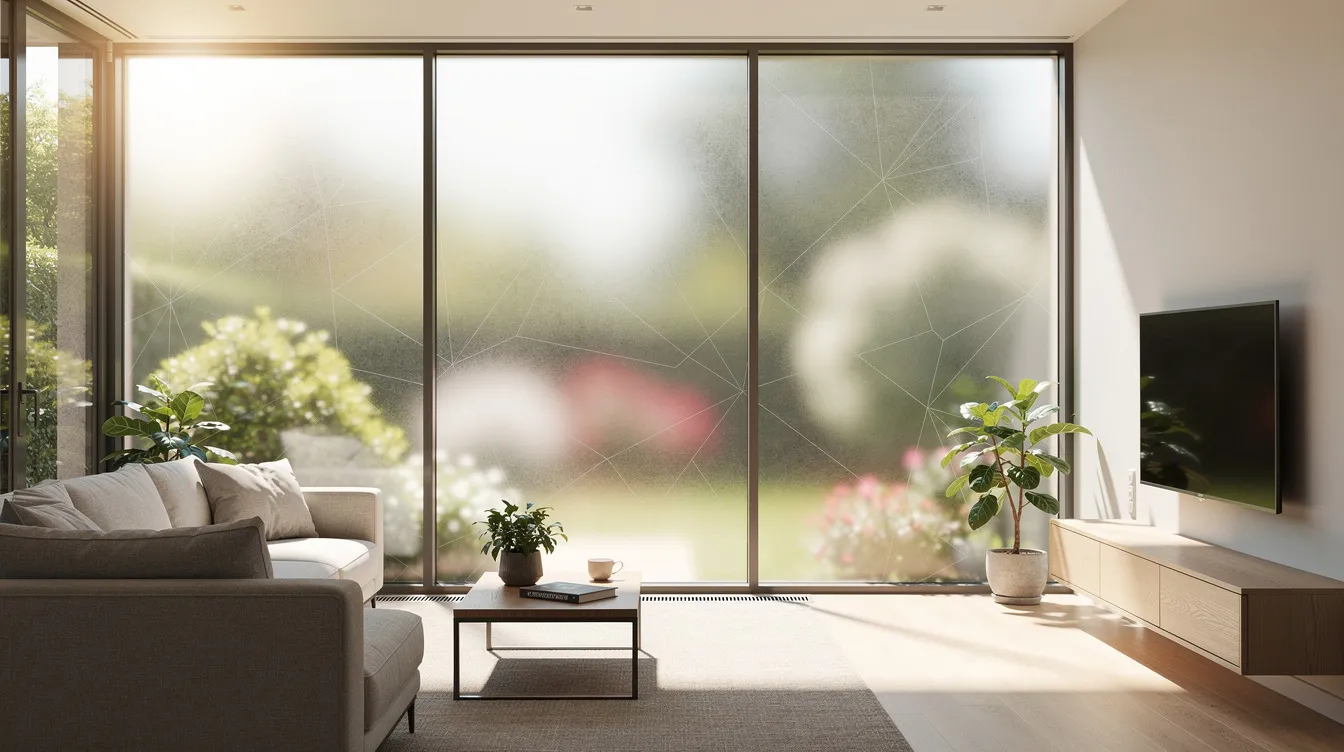
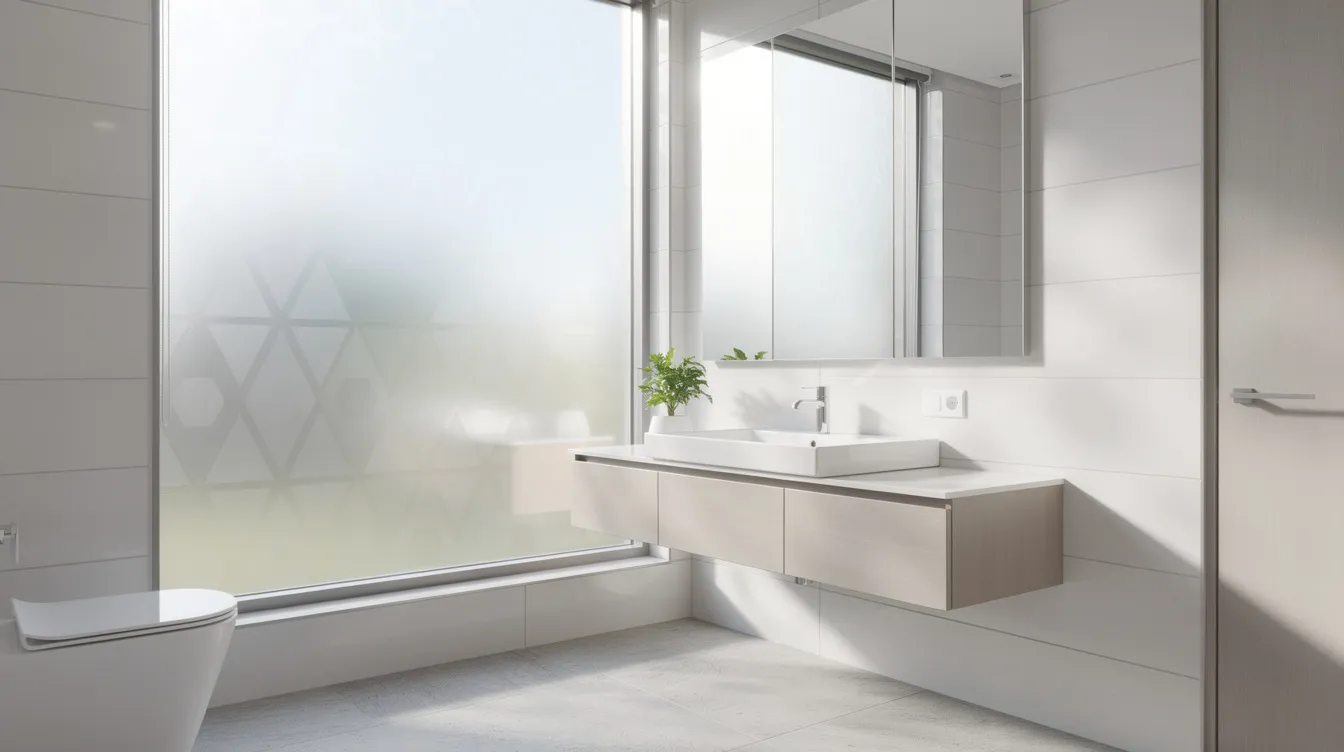
Frosted and Etched Design Films
Frosted and decorative films use textured surfaces to scatter light, providing consistent privacy regardless of whether it is day or night. This makes them fundamentally different from reflective films that depend on lighting conditions.
Popular frosted patterns include:
- Sand texture: A uniform, fine-grain frost that mimics sandblasted glass
- Etched glass designs: Patterns simulating traditional leaded or beveled glass
- Rain ripple: Vertical striations creating a flowing water effect
- Geometric patterns: Modern lines and shapes that add visual interest while obscuring views
- Gradient frost: Opaque at the bottom, gradually becoming clearer toward the top
Frosted films are commonly used in bathrooms and bedrooms to obscure views while allowing diffused light to enter, and there are several bathroom window film styles for privacy and light control that balance seclusion with daylight. They typically reduce visible light transmission (VLT) to moderate levels—around 20-50% depending on the pattern density—while still brightening your space with soft, ambient light.
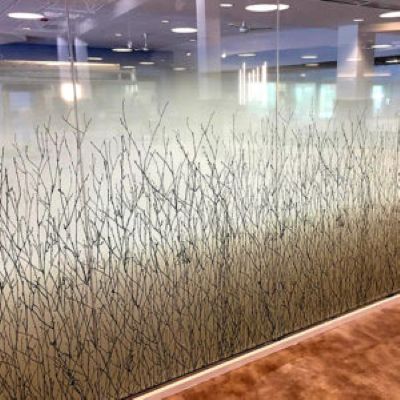
Decorative Privacy Films
Decorative privacy window film combines aesthetic enhancement with practical visibility blocking. Stained glass imitation films bring color and artistry to front door sidelights, bathroom windows, or office partitions without the expense of genuine stained glass. Mosaic patterns work brilliantly in shower enclosures where you want both privacy and style.
These films often feature colors like blue, purple, or gold accents that create focal points while maintaining their privacy function. Decorative glass films for interior and exterior windows provide privacy while still allowing natural light to enter, making them popular choices for residential applications. Installation typically uses either static cling or adhesive backing, depending on permanence needs.
Use cases include:
- Glass doors and sidelights on front door entryways
- Office partitions requiring privacy without complete opacity
- Bathroom windows and shower doors
- Patio doors where you want filtered light with decorative flair
The limitation with decorative films is cleaning difficulty around intricate patterns and potential adhesive degradation in direct sunlight over time.
DIY Fabric Privacy Screens
For those seeking complete customization, DIY fabric privacy screens offer endless possibilities. To create a DIY privacy window screen, you need to measure your window’s width and height, accounting for the thickness of the wood used in the frame. A DIY privacy screen can be made by cutting four pieces of wood to create a frame, which can then be covered with fabric or other materials for privacy.
When constructing a DIY privacy screen, you can use thin lining material or sheer fabric to allow some light to filter through while maintaining privacy. This approach lets you match your existing décor, choose exact opacity levels, and create removable panels that work perfectly in rental situations.
Key customization benefits:
- Match any color scheme or pattern to your room
- Choose from translucent to complete blackout fabric options
- Create removable panels that leave no damage
- Add texture and warmth that films cannot provide
DIY screens work particularly well for bedroom windows, nurseries where blackout capability matters, or spaces where you want privacy with a softer, more textured appearance than film provides. For homeowners who prefer professionally manufactured solutions, specialty privacy and decorative films from Window Film Depot can achieve similar privacy with a more polished finish.
Installation Methods and Implementation
With your screen type selected, proper installation ensures optimal performance and longevity. The techniques differ significantly between film and physical screen options.
Film Application Process
Film application requires patience and attention to detail but doesn’t demand special tools beyond basic supplies. Here’s the step-by-step process:
- Measure window dimensions accurately—measure width, height, and diagonal to ensure the frame is square. Allow 0.5-1/8 inch margin for trimming.
- Clean glass surface thoroughly using soapy water and a lint-free cloth. Remove all dust, oils, and residues from both the glass and surrounding edge of the frame.
- Apply solution and position film—for adhesive film, spray the adhesive side (or glass) with water mixed with mild soap; for static cling, position dry or with light moisture. Carefully align the film, starting at the top.
- Smooth out air bubbles with squeegee—work from the center outward using firm, overlapping strokes. Cut excess film with a sharp blade against the edge.
For adhesive films, allow 24-48 hours curing time. Temperature and humidity affect adhesion—avoid installation in extreme cold or high humidity conditions.
Screen Type Comparison
| Criterion | Static Cling Film | Adhesive Film | Physical/Fabric Screens |
|---|---|---|---|
| Durability | Low-Medium; prone to edge lifting | Medium-High; stable under heat | High; depends on material quality |
| Privacy Level | Moderate-High daytime; reduces at night | Moderate-High; depends on VLT and coating | Varies widely; blackout options available |
| Light Transmission | 20-70% VLT; some haze | Variable VLT with higher clarity | Often lower; depends on fabric density |
| Installation Difficulty | Easy; DIY friendly | Moderate; precision needed | Medium; requires hardware/mounting |
| Cost | Relatively low | Moderate to high | Variable; can be higher with framing |
| Rental Suitability | Excellent | Requires landlord approval | Good if removable |
| Choosing the right option: |
- Renters or commitment-averse users: static cling film
- Long-term homeowners wanting energy savings: adhesive ceramic or low-e films
- Those needing complete light control: physical screens with blackout fabric
- Bathrooms and showers: frosted adhesive film for consistent all-day privacy
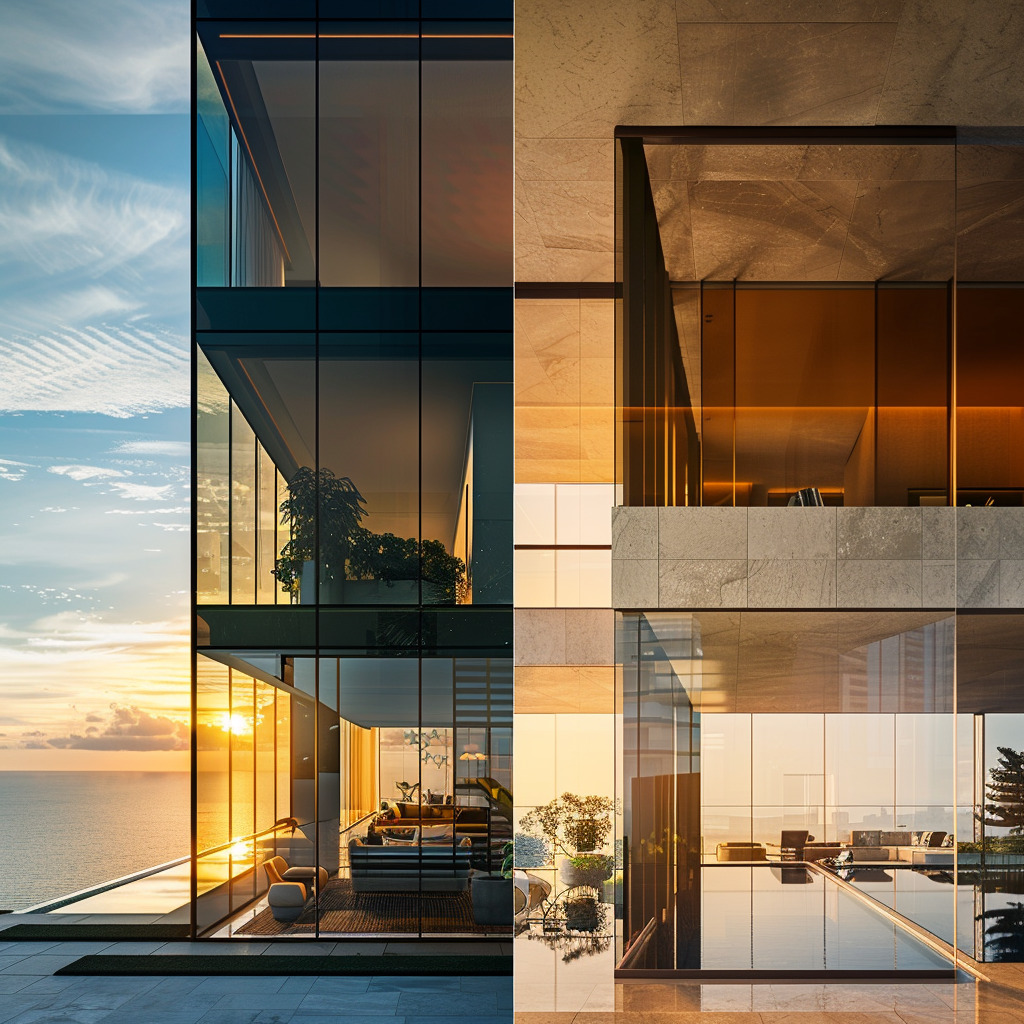
One way window film is a type of mirrored privacy window film that offers a high level of daytime privacy, creating a one way mirror effect when there is more light on one side than the other. The one-way mirror effect in real-world projects allows people inside to see outside while preventing those outside from seeing in, provided there is more light outside than inside. However, the effectiveness of one way window film is limited when applied to windows that face north or are shaded, as it requires direct exterior light to function effectively.
Common Challenges and Solutions
Even with proper planning, privacy screen installation can present obstacles. Here are the most frequent issues and their solutions.
Air Bubbles and Wrinkles
Air bubbles typically result from improper surface preparation, working too quickly, or applying film to dry glass.
Solution: Always use a wet installation method for adhesive films—the soapy water solution allows repositioning and prevents immediate adhesion. Work your squeegee from the center outward in overlapping strokes, applying firm, consistent pressure. If bubbles appear after the film has dried, small ones (under 1/4 inch) may be punctured with a pin and smoothed flat. Larger bubbles require peeling back the affected section and reapplying with additional solution.
Nighttime Privacy Concerns
One way window film does not provide nighttime privacy; when it is darker outside than inside, the effect is reversed, allowing people outside to see in. This “nighttime reversal” surprises many homeowners who expected 24-hour privacy from reflective films, which is why it’s important to understand best window film options for nighttime privacy before choosing a product.
Solution: Combine reflective or one-way films with curtains or blinds that you close after dark. Alternatively, choose frosted or decorative films that diffuse light regardless of conditions—they provide consistent privacy day and night because they scatter light rather than reflecting it, similar to day-and-night privacy film solutions used in commercial settings. Blackout and whiteout films completely block light transmission, making the glass entirely opaque, which eliminates the nighttime issue entirely but also blocks all natural light; in some cases, dual-reflective window films are chosen instead to balance privacy, glare reduction, and visibility.
Measurement and Sizing Issues
Windows aren’t always perfect rectangles, and films can shrink slightly during installation.
Solution: Measure each window individually rather than assuming identical sizes. Measure width at top and bottom, height at both sides, and check diagonal measurements to confirm squareness. When ordering film, add 1-2 inches to each dimension for trimming room. Use the roll against your measured dimensions before cutting—never cut based on packaging specifications alone. For physical screens, account for frame depth and hardware clearance when you’ve measured your installation space.
Careful planning prevents these common issues and ensures your privacy screens perform as expected from day one.
Conclusion and Next Steps
Window privacy screens offer a practical balance between maintaining natural light and creating the seclusion you need. Whether you choose static cling film for rental flexibility, adhesive ceramic films for energy savings and UV protection, or DIY fabric panels for complete customization, the right solution exists for every situation and budget.
The key is matching your choice to your specific needs: ground-floor windows may need lower VLT films or one-way options paired with night blinds; bathroom windows benefit from consistent frosted films; patio doors and glass doors might work best with decorative patterns that add style while providing function. Window privacy films can be used in various settings, including bathrooms and ground floor windows, to enhance privacy without sacrificing light.
Your immediate next steps:
- Measure your windows—record width, height, and diagonal for each window you want to treat
- Determine privacy needs by room—consider day vs. night visibility requirements and light preferences
- Choose appropriate screen type based on permanence needs, rental status, and desired features
- Gather installation materials—film kit with squeegee, spray bottle, utility knife, and clean cloths; or frame materials and fabric for DIY screens
One way window film is typically installed on the interior face of the glass to ensure the longest possible lifespan, as external application can shorten its effectiveness due to exposure to the elements. Shatter-resistant security films strengthen glass and deter break-ins by holding shards together if a window breaks—worth considering if security is also a concern, and they can be combined with advanced privacy window films and coatings to address multiple needs at once.
Need More Info?
The Window Film Depot team is happy to help.
For further inspiration, explore related topics like energy-efficient window treatments for additional savings, security window films and shatter-resistant options for ground-floor protection, or smart glass technologies that offer dynamic privacy control at the touch of a button.
Frequently Asked Questions
Can window privacy screens be removed without damage?
Static cling films can be removed without leaving any residue or damage—simply peel from one corner and the film releases cleanly. Privacy window films can be made from various materials, including static cling and adhesive types, allowing for easy application and removal without leaving residue. Adhesive films are more challenging; they may leave glue residue requiring cleaning solutions, and improper removal can potentially damage seals on insulated glazing units or void window warranties. Physical screens leave only minor hardware marks (screw holes) but no glass damage.
Do privacy screens reduce natural light significantly?
It depends on the type. Films with low VLT (5-20%) noticeably darken rooms, while frosted or decorative films with moderate VLT (30-60%) reduce light less dramatically. Most privacy films allow natural daylight to enter while blocking prying eyes. Physical screens vary widely—sheer fabrics transmit substantial light, while blackout materials block it entirely. For maximum light with privacy, choose films with VLT ratings above 40%.
What’s the difference between one-way and frosted privacy films?
One-way (reflective/mirror) films rely on light differential to work—they provide privacy when outside light exceeds interior light, creating a mirror effect for outside viewers. At night with interior lights on, this reverses. Frosted films always diffuse visibility by scattering light through textured surfaces, providing consistent privacy both day and night regardless of lighting conditions. Choose one-way for daytime privacy with clear outward views; choose frosted for 24-hour privacy with diffused light, and consider 3M frosted window film options if you want designer patterns along with consistent privacy.
How do I clean and maintain privacy window screens?
Use a non-abrasive cloth with mild soap and water. Avoid ammonia-based cleaners (like some glass cleaners) or harsh solvents, which can damage film coatings and cause them to peel or yellow. Never use abrasive pads or scrapers on film surfaces. For physical screens, dust regularly and wash fabric components according to their care instructions. Check mounting hardware periodically for looseness or rust if using metal brackets.
Are privacy screens effective for ground-floor windows?
Yes, privacy screens are particularly valuable for ground-floor windows where pedestrian traffic creates visibility concerns. Films with lower VLT (5-20%) or reflective coatings provide strong daytime privacy. For night privacy when interior lights create the reverse effect, pair films with blinds or choose frosted films that work regardless of lighting conditions. Combining a reflective film with blackout curtains gives you flexibility—privacy and views during the day, complete seclusion at night.
Can I install privacy screens on rental property windows?
Yes, with the right approach. Static cling films are ideal for renters—they install without adhesive, remove without residue, and don’t require landlord permission in most cases. DIY fabric screens mounted with tension rods or removable brackets also work well. Avoid adhesive films unless you have explicit landlord approval, as removal can leave residue or damage that might result in security deposit deductions. Always take photos before installation to document the original window condition.

