Table of Contents:
Introduction
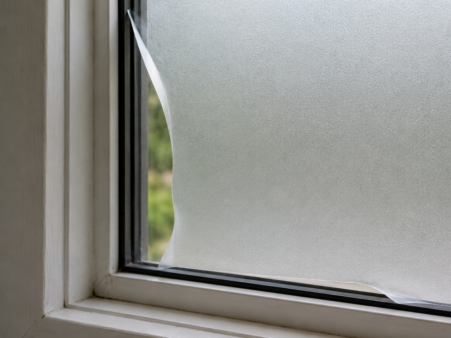
Frosted privacy window film is a translucent covering applied to glass surfaces that obscures the view while allowing natural light to pass through. This frosted glass window film provides an effective way to add privacy to any room without sacrificing brightness or requiring permanent modifications to your windows.
This guide covers static cling films, adhesive options, and applications for both residential and commercial spaces. We’ll explore everything from basic frosted film to decorative patterns and tinted varieties suitable for glass doors, bathroom windows, and office partitions. What falls outside this scope includes permanently etched glass methods and heavy-duty security films designed primarily for impact resistance rather than privacy.
Whether you’re a homeowner looking to add privacy to a bathroom, a renter seeking a solution that won’t damage your deposit, or an office manager wanting to create separate spaces without losing light, this guide addresses your specific needs and goals.
Direct answer: Frosted privacy window film provides up to 96% privacy protection while maintaining significant light transmission, and most options can be installed without professional help in minutes using basic tools.

By the end of this guide, you’ll gain:
- Clear understanding of different frosted glass films and their privacy levels
- Step-by-step installation techniques for both static cling and adhesive films
- Knowledge to choose the right opacity level for your specific situation
- Solutions for troubleshooting common installation issues
- Strategies for maximizing cost savings through DIY application
Understanding Frosted Privacy Window Film
Frosted privacy window film consists of a thin plastic or vinyl material that replicates the appearance of sandblasted or acid-etched glass. The film’s microscopic surface texture scatters visible light, creating a translucent effect that blocks direct view while transmitting a high proportion of natural light into your space.
Static Cling vs Adhesive Films
Static cling window films use no glue or adhesive—they adhere to clean, non-porous glass surfaces through micro-suction created when the film is smoothed against wet glass. This makes them super easy to install and completely renter friendly since they leave no residue when removed, while professional providers like Window Film Depot focus more on large-scale commercial film solutions.
The primary benefits of static cling films include:
- Easy removal and reusability—you can pull them off, store them in unused condition, and reposition them elsewhere
- No adhesive residue to clean up when you move out
- Simple repositioning if you don’t get placement perfect the first time
Adhesive films use pressure-sensitive or solvent-based adhesives that cure over time for a permanent or semi-permanent bond. These films offer greater durability and resistance to humidity and heat, making them ideal for long-term installations where you own the property. However, removal may leave residue requiring cleaning with a scraper or solvent.
Opacity Levels and Privacy Protection
Frosted films come in varying opacity levels, typically measured by Visible Light Transmission (VLT) and privacy ratings. Understanding these measurements helps you select the perfect film for your needs.
Lite frost films transmit approximately 90% of visible light with a privacy rating around 3/5. This textured appearance allows shapes and movement to be perceived depending on lighting conditions—ideal when you want to reduce glare and add some privacy without completely blocking the view.
Full frost or heavy frost films transmit around 30% of light with a 5/5 privacy rating. These create complete visual obscurity while still allowing diffused light to enter your room.
One important consideration: during daytime, external light helps maintain privacy, but at night with interior lights on and darkness outside, even frosted film may allow silhouettes to show. If nighttime privacy is critical, choose a heavy frost option or plan for supplemental window coverings.
The opacity level you select depends on your specific application—whether you’re covering bathroom windows that need maximum privacy or office partitions where some visual connection is desirable.
Types and Applications of Frosted Window Films
Building on the opacity concepts above, frosted window films come in several distinct styles, each suited to different aesthetic and functional requirements.
Pure Frosted Films
Classic white frosted film provides a uniform matte finish that simulates expensive sandblasted glass. This style offers approximately 96% privacy protection while maintaining a clean, neutral appearance that complements any décor.
Pure frosted films work great for applications like bathroom window privacy films:
- Bathroom windows and shower doors
- Glass doors leading to bedrooms or private offices
- Sidelights and entryway windows
- Medical office partitions requiring patient privacy
High-quality versions block up to 99% of UV rays, protecting furniture and flooring from fading while creating a comfortable, glare-free space.
Decorative Frosted Patterns
When you want both privacy and visual interest, decorative frosted glass films deliver on both fronts. Options such as 3M frosted glass finishes exemplify how these products can elevate commercial interiors. Popular frosted design patterns include:
3D diamond textures that create depth and visual movement while obscuring the view. These patterns catch light beautifully and add architectural interest to plain glass.
Reeded glass patterns that mimic expensive textured glass with vertical or horizontal lines. This classic appearance suits traditional and contemporary spaces equally well and is part of a broader family of decorative films for interior and exterior glass.
Etched glass designs featuring geometric shapes, botanical motifs, or custom patterns. These can create the appearance of expensive decorative glass at a fraction of the cost.
Gradient films that fade from clear to frosted offer partial privacy while preserving views in specific areas—perfect for conference room glass where you want privacy at eye level but openness above.

Tinted Privacy Films
Tinted frosted films combine privacy function with heat blocking properties and aesthetic warmth. Available in colors ranging from neutral grays to warm beiges and soft blues, these films add privacy while contributing to energy-efficient solar control.
The heat blocking capabilities vary by film construction—basic tinted films primarily diffuse visible light, while premium options with ceramic or metalized layers significantly reduce solar heat gain. This makes them particularly suitable for south-facing windows where both privacy and temperature control matter.
Each film type serves different room applications: pure frost for bathrooms requiring maximum privacy, decorative patterns for living spaces where aesthetics matter, and tinted options for home offices where glare reduction and heat control enhance comfort, especially when you want consistent day and night privacy.
Installation Process and Comparison Methods
One of the greatest benefits of frosted privacy film is how easy the installation process can be for DIY enthusiasts. With proper preparation and technique, most homeowners can achieve professional-looking results in minutes per window, and many DIY window film installation guides mirror the process outlined below.
Step-by-Step Static Cling Installation
Static cling installation works best when you want a renter friendly, repositionable solution. Here’s the process:
- Clean the surface thoroughly using a non-ammonia mild detergent to remove all grease, fingerprints, and debris. Use a scraper carefully to remove any stubborn spots, then dry with a lint-free cloth. Any dust or residue will cause adhesion problems.
- Measure and cut the film to size, leaving approximately 1cm extra margin on all sides for trimming. Keep the protective backing on during cutting for easier handling. Use quality tools for clean edges.
- Apply water liberally to the glass surface using a spray bottle filled with water and a few drops of mild dish soap. This slip solution allows you to reposition the film before it sets.
- Position the film on the wet glass, sliding it into the perfect placement. Static cling films don’t have adhesive, making this step simple and forgiving.
- Smooth from center to edge using a plastic squeegee or credit card wrapped in soft cloth. Push water and air bubbles toward the edges with firm, overlapping strokes. Take your time here—this step determines your final appearance.
- Trim excess film using a sharp utility knife guided along the window frame. Leave 1-2mm gap from the frame edge to allow for thermal expansion.
Installation Method Comparison
| Criterion | Static Cling | Adhesive Film |
|---|---|---|
| Ease of removal | Very easy—pull off, no residue | More difficult—may require scraper and solvent |
| Rental suitability | Excellent—completely renter friendly | Less suitable—may violate lease terms |
| Longevity | 5-10 years depending on conditions | 15-20 years with quality films |
| Cost | Lower upfront investment | Higher cost but longer lifespan |
| Repositioning | Easily adjusted during and after install | Must get it right first time |
| Humidity resistance | May lose cling in high humidity | Better performance in bathrooms |
| Choosing between them: Select static cling if you rent, want easy removal, or plan to update your décor periodically. Choose adhesive film for permanent installations, high-humidity environments like bathrooms, or when maximum durability matters. |
Understanding these differences helps you avoid problems before they occur—which brings us to troubleshooting.
Common Challenges and Solutions
Even with careful preparation, installation issues can arise. Here’s how to handle the most common problems.
Air Bubbles During Installation
Air bubbles typically result from insufficient water application, trapped dust particles, or uneven squeegee pressure.
Solution: Spray more water than you think necessary—the glass should be thoroughly wet. If bubbles appear, work them toward the nearest edge using firm, overlapping squeegee strokes from the center outward. For stubborn small bubbles, carefully puncture with a fine needle, then press flat. Working in a dust-free environment and cleaning the glass twice helps prevent this issue entirely.
Film Not Adhering to Glass
Poor adhesion usually stems from inadequate surface preparation, incorrect installation temperature, or cutting the film too close to the frame edge.
Solution: Ensure the glass surface is completely clean—any residue from cleaning products, fingerprints, or silicone will prevent proper contact. Install when glass temperature is above 50°F (10°C); cold glass causes adhesion problems with both static cling and adhesive films. Leave that 1-2mm gap from frame edges, and for adhesive films, allow full curing time (typically 24 hours) before testing adhesion.
Uneven Light Transmission
Patches of different opacity or visible wrinkles create inconsistent light diffusion and unprofessional appearance, and they can be especially frustrating when you’re aiming for reliable nighttime privacy window film performance.
Solution: Use the highest quality film your budget allows—thicker films (2+ mil) resist wrinkling and provide more uniform light transmission. During installation, smooth methodically with overlapping strokes rather than random movements. If wrinkles develop, peel back the film slightly, re-wet the glass, and reapply. For static cling films, complete removal and starting fresh often produces better results than attempting repairs.
Addressing these challenges properly ensures your finished installation looks professional and performs as expected for years to come.
Conclusion and Next Steps
Frosted privacy window film offers an accessible, cost-effective way to add privacy to any glass surface while preserving natural light and enhancing aesthetics. Whether you choose a simple static cling option or invest in premium adhesive film with decorative patterns, the installation process is straightforward enough for most DIY enthusiasts to handle confidently.
Your immediate action steps:
- Measure your windows precisely, noting both dimensions and any curved or textured glass that might affect film selection
- Determine your privacy requirements—consider both day and night needs, and choose opacity level accordingly
- Decide between static cling (for flexibility and rental situations) or adhesive (for permanence and durability)
- Gather installation tools: spray bottle, mild soap, squeegee, utility knife, measuring tape, and lint-free cloths
- Schedule installation for a moderate temperature day with adequate time to work carefully
Related topics you might explore: window security films for added protection, innovative privacy and decorative window films for aesthetic enhancement, and energy-efficient window solutions combining privacy with thermal performance. Smart glass and switchable privacy technology represents the cutting edge if you’re interested in cloaking and smart film installations.
Need More Info?
The Window Film Depot team is happy to help.
Frequently Asked Questions
How long does frosted privacy window film last?
High-quality adhesive films typically last 15-20 years, with many manufacturers offering lifetime warranties. Static cling films generally last 5-10 years depending on climate, humidity exposure, and handling. Proper installation and maintenance—using non-abrasive cleaners and avoiding harsh chemicals—maximizes lifespan regardless of film type.
Can frosted window film be removed without damaging glass?
Yes. Static cling films remove easily by simply pulling from one edge—they leave no residue and can be stored for reuse. Adhesive films require more effort; removal may leave adhesive residue requiring solvent or scraper cleanup, but the glass itself remains undamaged when proper techniques are used.
Does frosted film block UV rays and heat?
Most quality frosted films block approximately 99% of UV rays, protecting furnishings from fading. Heat rejection varies significantly by construction—basic frosted vinyl primarily diffuses visible light, while films with ceramic or metalized layers provide meaningful heat reduction. Check manufacturer specifications if heat blocking is a priority.
What’s the difference between 17.5” and custom-width films?
Standard width films (like 17.5”) suit most residential windows and are easier for DIY handling. Larger commercial rolls (up to 60” wide) cover bigger glass panels with fewer seams—important for conference rooms, storefronts, or glass partitions where visible seams would be undesirable.
Can frosted film be applied to curved or textured glass?
Textured or rippled glass presents challenges because reduced contact area weakens adhesion and traps air bubbles. Static cling performs poorly on textured surfaces. Adhesive films work somewhat better but may show distortion. Curved glass requires flexible film and expert trimming. For best results on non-standard glass, consider professional installation.
How much privacy does frosted film provide at night?
During daytime, frosted film provides excellent privacy because external light masks interior details. At night with interior lights on and darkness outside, silhouettes may be visible through lighter frost films (high VLT). For complete nighttime privacy, choose heavy frost options or supplement with blinds or curtains.
Is professional installation worth the cost?
Professional installation ensures better surface preparation, precision cutting, and often preserves manufacturer warranties. The finished job typically lasts longer with fewer issues. However, for simple rectangular windows with quality static cling film, confident DIYers can achieve excellent results. Reserve professional help for large projects, adhesive films, or challenging glass situations.
What tools are needed for DIY installation?
Essential tools include: spray bottle with water and mild soap, plastic squeegee or smoothing tool, sharp utility knife, measuring tape, lint-free cloths, and glass cleaner (non-ammonia). Optional but helpful: heat gun (for stubborn wrinkles in adhesive films), edge sealing tape, and protective gloves. Most installations require nothing beyond these basic items.

