Table of Contents:
Introduction
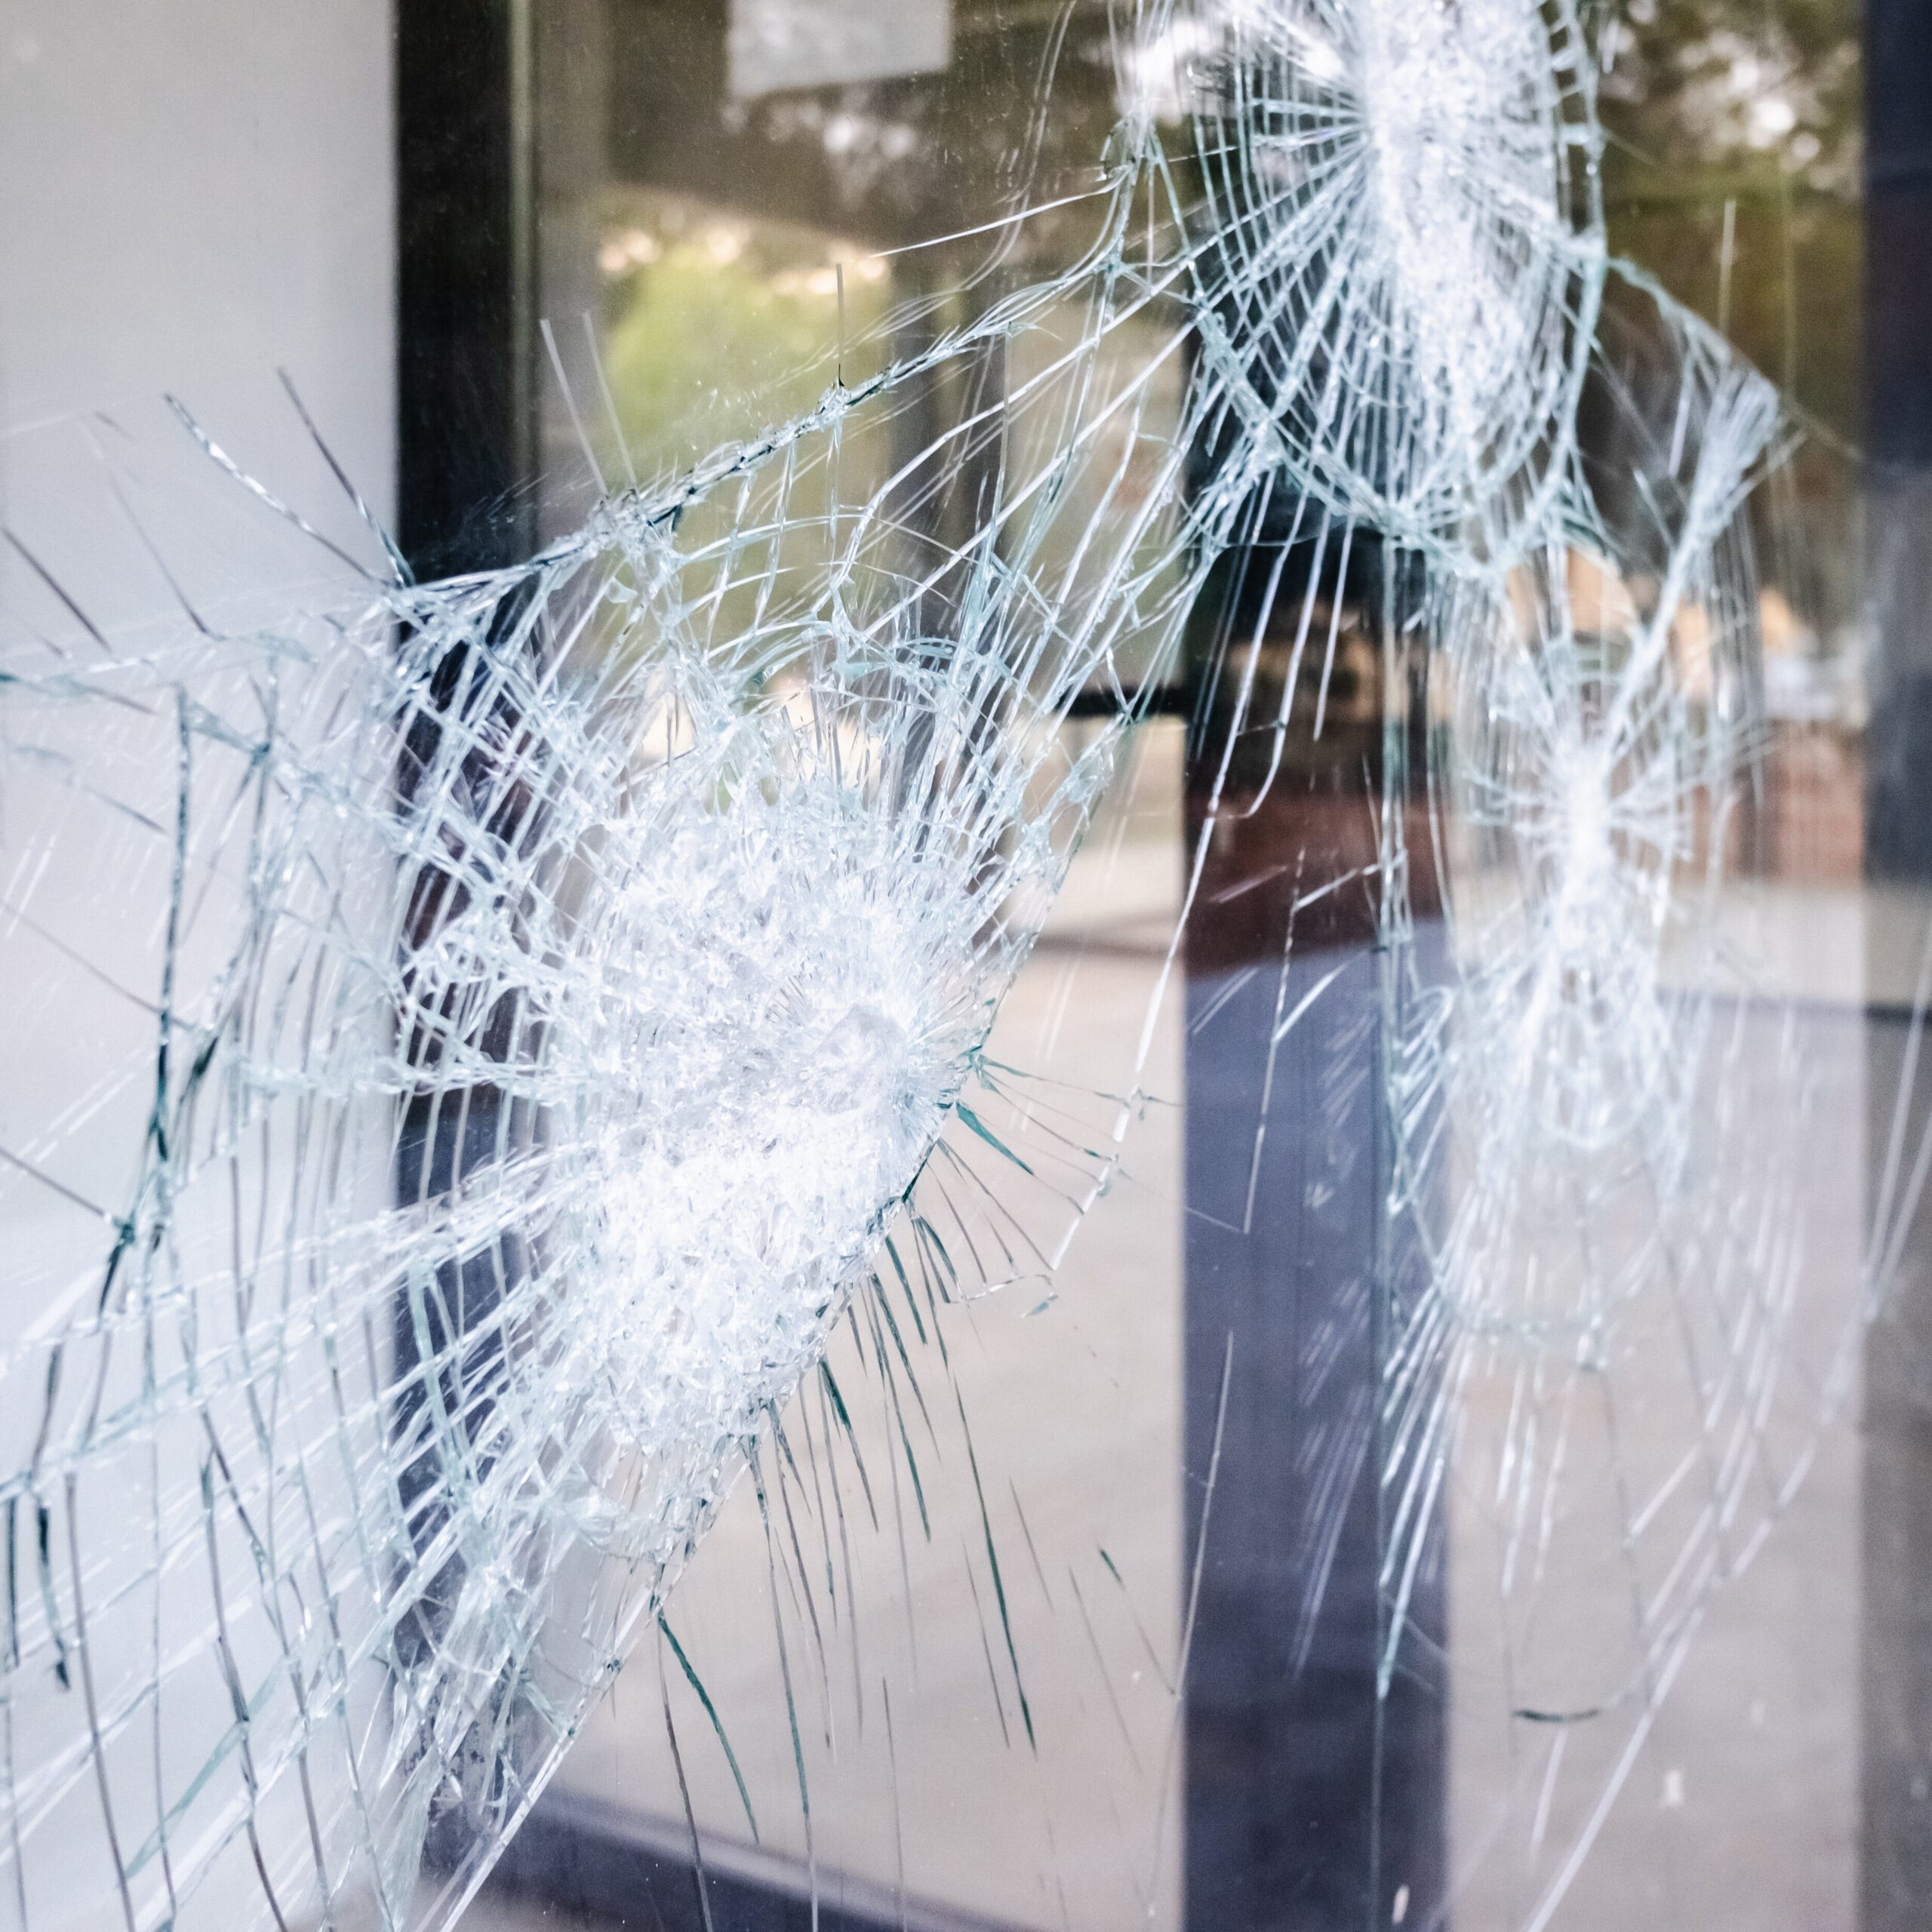
Window security film installation transforms ordinary glass into a protective barrier that holds shattered fragments in place, delays forced entry, and enhances safety for homes and commercial buildings alike. This specialized process involves applying multi-layer polyester film to existing windows using specific techniques that ensure proper adhesion and long-term performance.
This guide covers the complete installation process for both residential and commercial applications, including essential tools, step-by-step procedures, cost considerations, and the critical decision between DIY and professional installation. Whether you’re a property owner looking to protect your family, a facility manager securing an office building, or a security professional evaluating options for schools or business locations, this content addresses your specific needs.

Direct answer: Security window film installation requires applying specialized polyester film (typically 4-15 mil thick) to glass surfaces using a wet application method, followed by careful squeegee work to remove bubbles, precise trimming, edge sealing, and a curing period of 3-7 days for optimal adhesion.
By reading this guide, you will:
- Understand the different types of security films and how they impact installation requirements
- Master the step-by-step installation process used by professional installers
- Learn to avoid common mistakes that compromise film performance and longevity
- Evaluate realistic cost factors for your specific project
- Determine when professional installation is vital versus when DIY is appropriate
Understanding Window Security Film
Successful film installation begins with understanding what security window film actually is and how different film types affect the installation process. This foundational knowledge ensures you select the right product and apply techniques designed for that specific material.
What is Security Window Film
Security film is a multi-layer polyester (polyethylene terephthalate) material designed to hold glass fragments together upon impact, significantly delaying break-ins and protecting occupants from flying shards. Unlike decorative window films, security film starts at approximately 4 mil thickness (0.004 inch) for basic shatter-resistance, with mid-range options at 8-12 mil and premium protection reaching 12-15 mil or more.
The protective properties depend on three factors: film thickness, adhesive strength, and edge attachment to the window frame. Thicker films require different installation techniques—more careful handling during application, stronger adhesives, and often mechanical anchoring to the frame for optimal performance. Understanding these requirements before starting ensures the installation job delivers the protection you expect.
Types of Security Films Available
Clear security film provides nearly transparent protection focused purely on safety and strength, making it ideal when maintaining the natural appearance of windows is a priority. Tinted security options combine full protection with sun and glare reduction, while reflective films add heat rejection through metallized layers.
Specialty films serve specific purposes: anti-graffiti films and other window protection solutions feature a sacrificial outer layer that’s easier to replace than the entire installation, storm protection films are designed for debris impact in severe weather, and blast-resistant products meet building code standards for commercial and government facilities.
Film type directly affects installation complexity. Thicker security films demand more precise cutting, stronger adhesive application, and often require edge anchoring systems. Specialty films may need longer curing times and more elaborate surface preparation—factors that influence whether professional installation makes sense for your project.
Security Film vs Regular Window Tint
Regular window tint focuses on comfort: privacy, glare reduction, and UV protection. Its thickness typically runs 1-2 mil, lacking the strength to hold glass together once broken. Security window films and true shatterproof options, by contrast, are engineered specifically to retain shards, resist forced entry from intruders, and maintain integrity under impact.
The installation requirements differ substantially. Regular tint applies with simpler adhesives and basic techniques. Security film demands more precise measurements, stronger adhesives, optional frame anchoring, and often certified installers for warranty coverage. This distinction matters when evaluating installation costs and deciding whether to protect your property through DIY methods or professional service.
Pre-Installation Requirements
Proper preparation directly determines installation success. Even the best security film fails to protect when applied to improperly cleaned surfaces or cut to incorrect measurements.
Essential Tools and Materials
Professional-quality installation requires specific tools designed for working with thick, adhesive-backed films, many of which are readily available in DIY window film installation kits:
- Squeegees: Multiple sizes and stiffnesses, including felt-edged versions to avoid scratching thick film during bubble removal
- Cutting tools: Sharp utility blades and straight-edges for clean trimming; dull blades tear film and create visible imperfections
- Application supplies: Spray bottles filled with soapy water or proprietary slip solution that allows film positioning before final adhesion
- Measuring equipment: Quality measuring tape and templates for accurate film sizing
- Cleaning supplies: Glass cleaner or alcohol-based degreasers, lint-free cloths, and microfiber materials for perfect surface preparation
- Finishing materials: Adhesive sealants or silicone-based edge treatments; mechanical anchoring systems for premium installations
A basic tool investment runs $50-$100 for DIY installers tackling multiple windows, while overall window security film installation costs vary based on film type, window size, and project complexity. Professional installers bring commercial-grade equipment that ensures consistent results across every surface.
Window Assessment and Preparation
Accurate measurements prevent costly waste and visible gaps. Measure each pane carefully, accounting for frame recess—the glass size minus the overlay where the frame covers the edge. Measure height and width at multiple points, as windows are rarely perfectly square. Add a small margin for trimming in place.
Assess glass condition before beginning. The surface must be free from dirt, silicone, paint residue, or old adhesive. Edge gaskets require inspection; damaged seals can allow moisture infiltration that compromises adhesion over time. Triple-pane or laminated glass requires verification of temperature compatibility with your chosen film.
Frame type—wood, aluminum, vinyl, or steel—affects anchoring options and adhesive compatibility, especially when specifying commercial-grade Scotchshield safety and security films. Document any irregular shapes, curved surfaces, or muntin bars that complicate the cutting process.
Environmental Considerations
Temperature and humidity significantly impact installation quality and curing time. The ideal temperature range falls between 60°F and 90°F (15-32°C). Humidity under 50-60% is optimal; higher moisture levels delay curing and can trap water beneath the film.
Avoid direct sunlight during application—uneven surface heating causes adhesive to behave unpredictably. Schedule installation for shaded conditions when possible. Wind, dust, or airborne debris interfere with film placement, so ensure doors and windows remain closed during the process.
These environmental factors connect directly to your installation timeline. Poor conditions extend curing from the standard 3-7 days to 10-14 days, delaying the point when film reaches full protective strength.
Step-by-Step Installation Process
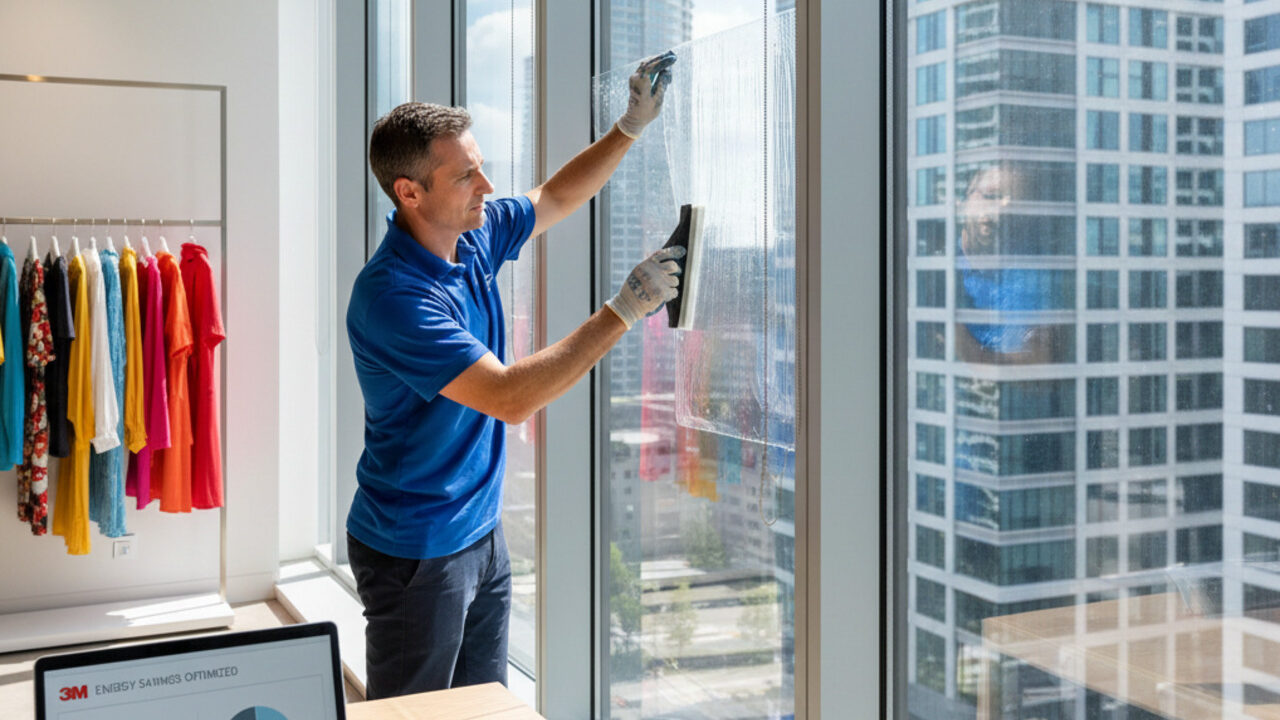
With proper preparation completed, the installation process follows a systematic approach that professional installers have refined through thousands of applications, particularly when working with 3M window film products and installation services.
Professional Installation Procedure
This procedure applies whether you’re completing a DIY installation or understanding what a professional installer should deliver:
- Surface preparation and cleaning: Remove all dirt, old film residue, and sealant from the glass. Clean with alcohol-based degreaser, then ensure the surface is completely dry before proceeding. Any contamination creates weak spots in adhesion.
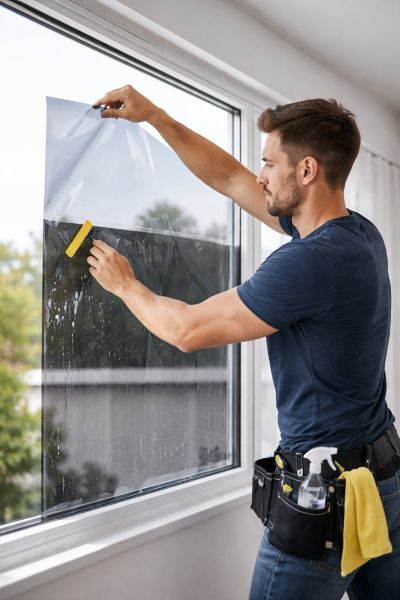
- Measuring and cutting film to size: Cut film slightly larger than the glass area—typically adding a small margin on each edge for trimming in place. Use templates for irregular shapes. Sharp blades and straight-edges ensure clean cuts.
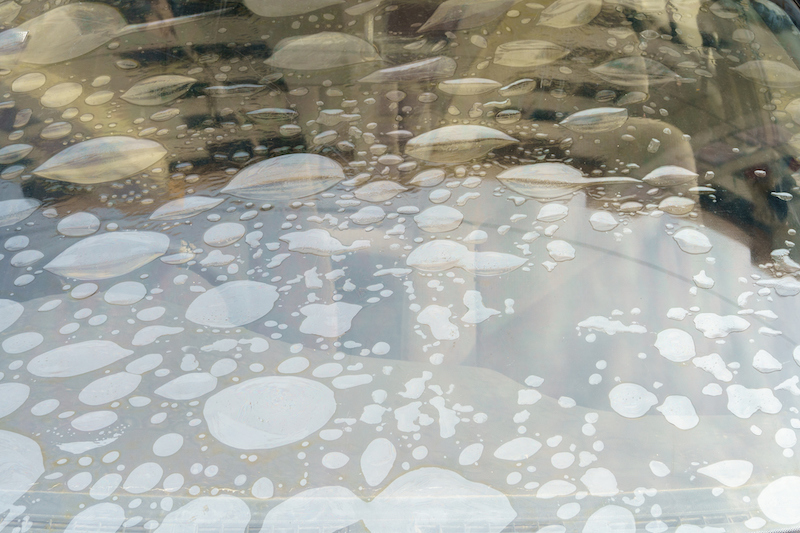
- Applying soapy water solution: Spray the glass heavily with slip solution. This liquid layer allows you to position and adjust the film before adhesion takes hold. Insufficient solution makes repositioning difficult and increases bubble formation.
- Film placement and bubble removal: Peel the backing and apply film onto the wet glass. Slide to achieve perfect alignment with edges. Using a squeegee, work from the center outward in overlapping strokes to push out water and air bubbles. Thick films require gentler initial pressure, then firmer passes once position is confirmed.
- Trimming excess material: With a sharp utility blade and straight-edge, trim carefully at the frame edge. For installations requiring frame anchoring, leave appropriate edge margins. Clean cuts prevent peeling points.
- Edge sealing and finishing: Apply adhesive sealant or silicone-based treatment around the entire perimeter. Some installations require mechanical anchoring along the frame for maximum protection. This step is vital for preventing edge lifting.
- Drying and curing process: Surface moisture evaporates within hours, but full cure—when adhesive reaches maximum strength—typically takes 3-7 days. Thicker films, high humidity, or low temperatures can extend curing to 14 days. Avoid cleaning or touching the film during this period.
DIY vs Professional Installation Comparison
| Factor | DIY Installation | Professional Installation |
|---|---|---|
| Cost | Material only: $3-$10 per sq ft; tool investment $50-$100 | Material + labor: $7-$15 per sq ft standard; higher for specialty |
| Time required | Several days for 15-20 windows; learning curve adds time | Full home typically completed in one day |
| Tool investment | Must purchase all equipment; quality may vary | Installer brings professional-grade tools |
| Warranty coverage | Often limited to product defects; improper work may void coverage | Manufacturer and installer warranties typically included |
| Success rate | Risk of bubbles, misalignment, edge peeling, improper curing | Higher reliability; meets security specifications |
| For straightforward residential applications with accessible windows, DIY installation can deliver acceptable results at lower cost. Professional installation becomes the ideal choice for commercial buildings, high or difficult-to-reach windows, specialty applications like blast resistance, and any situation where certified performance or warranty coverage is required, often best handled by experienced nationwide window film installers. |
Installation Timeline and Expectations
A professional installer typically completes a standard residential window (15-25 square feet) in 30-60 minutes, including cleaning, cutting, applying, trimming, and sealing. An entire home with 10-20 windows often takes a full day.
Commercial storefronts and office buildings with larger panels require multiple days depending on scope. Factors affecting duration include:
- Number and complexity of windows (size, shape, accessibility)
- Whether old film must be removed first
- Environmental conditions requiring adjusted techniques
- Frame anchoring requirements for enhanced security
- Ground floor versus high-rise accessibility
Full curing extends the timeline beyond installation day. Plan for 3-7 days before the film reaches maximum adhesion, with thicker films or challenging conditions potentially requiring up to two weeks.
Common Installation Challenges and Solutions
Even experienced installers encounter difficulties. Understanding these challenges and their solutions prevents costly mistakes and ensures your security film performs as designed.
Air Bubbles and Wrinkles
Bubbles form when insufficient slip solution prevents proper film positioning or when squeegee technique fails to push all air to the edges. Thick security films trap bubbles more easily than thin decorative tints.
Solution: Apply generous amounts of wetting solution—more than you think necessary. Position the film while it’s still floating on the liquid layer. Use overlapping squeegee strokes from center to edges, maintaining consistent pressure. For wrinkles, do not stretch the film; instead, lift and reposition before completing final passes. If bubbles remain after curing, professional removal and reapplication may be necessary.
Film Misalignment and Cutting Errors
Mis-measuring creates visible gaps or wasted material. Rushing through template creation or using inconsistent measurement points leads to film that doesn’t fit the window properly.
Solution: Always overcut slightly and trim in place rather than attempting perfect pre-cutting. Measure height and width at multiple points—top, middle, and bottom. Create templates for irregular shapes. Use new, sharp blades; dull edges tear the film and create ragged edges that encourage peeling.
Edge Lifting and Adhesion Problems
Edges represent the most vulnerable point of any installation. Improper surface preparation, missing edge sealant, or inadequate curing time all contribute to lifting that compromises security protection.
Solution: Clean frame edges thoroughly before application. Apply appropriate sealant around the entire perimeter. For high-security applications, consider mechanical anchoring systems that attach the film to the frame rather than relying solely on adhesive. Match your adhesive choice to the frame material and local climate conditions.
Curing Issues in Different Weather
Cold temperatures slow the curing process dramatically. High humidity traps moisture beneath the film. Direct sun can overheat surfaces, causing adhesive to cure unevenly or bubble.
Solution: Schedule installation when temperatures fall within the 60-90°F range. Shade windows during application when possible. Extend expected curing time in challenging conditions—plan for 10-14 days rather than the standard 3-7 days. Avoid cleaning or disturbing the film during the extended cure period.
Conclusion and Next Steps
Security window film installation protects your property by transforming ordinary glass into a safety barrier that holds together under impact, delays forced entry, and reduces injury risk from flying shards. Success depends on selecting the appropriate film type from a wide range of window glass film products and brands, preparing surfaces meticulously, following proper application techniques, and allowing adequate curing time.
Your immediate next steps: Property owners can also explore specialized window film solutions from Window Film Depot or, for those in Northern California, professional window film installation in the San Francisco Bay Area to match project scope and location.
- Assess your windows and measure total square footage: Document each window’s size, shape, accessibility, and frame type to build an accurate scope for your project
- Choose film type based on security needs: Match thickness and features to your protection requirements—4-8 mil for basic safety, 8-12 mil for enhanced security, 12+ mil for high-risk applications
- Decide between DIY and professional installation: Evaluate your comfort level with the process, the complexity of your windows, and whether warranty coverage or certified performance matters for your situation
Need More Info?
The Window Film Depot team is happy to help.
Related topics worth exploring: Long-term film maintenance practices, integration with broader security systems, building code compliance requirements for commercial applications, and insurance considerations that may offer premium reductions for certified installations.
Frequently Asked Questions
How long does security film installation take?
Professional installation of a single standard window takes 30-60 minutes. A complete home with 10-20 windows typically requires a full day. Commercial projects may span multiple days. DIY installations take longer due to the learning curve.
What is the average cost per square foot for installation?
Professional installation ranges from $7-$15 per square foot for standard security film, with specialty options (blast-resistant, anti-graffiti) costing more. DIY material-only costs run $3-$10 per square foot. Total residential projects typically fall between $1,500-$6,000 depending on square footage and film quality.
Can security film be installed on tempered glass?
Yes, provided the film is compatible with the thermal characteristics of tempered glass. Verify compatibility with the manufacturer, as some adhesives may not tolerate the thermal stress patterns in tempered products.
How long does the film take to fully cure?
Standard installations require 3-7 days for complete adhesive curing. Thicker films, high humidity, or temperatures outside the optimal range may extend curing to 10-14 days. Avoid cleaning or disturbing the film during this period.
Is special licensing required for professional installation?
Requirements vary by jurisdiction. Some areas require certification for safety-rated installations, particularly for commercial buildings or applications requiring code compliance. Verify local requirements before hiring an installer or starting a DIY project.
What warranty should I expect with professional installation?
Manufacturer warranties typically cover 5-15 years for defects including peeling, hazing, and adhesion failure. Premium products may offer lifetime coverage. Professional installer warranties often add coverage for installation workmanship. DIY installation may void manufacturer warranties.
Can security film be removed without damaging windows?
Yes, professionally installed film can typically be removed without glass damage. Adhesive residue may remain and require cleaning. Improper removal techniques can scratch glass. Removal costs generally run per window or per square foot.
How do I maintain security film after installation?
Use non-abrasive, ammonia-free cleaners and soft cloths. Avoid sharp objects that could scratch the surface. Inspect edges annually for lifting or seal degradation. Reseal or repair as needed. With proper care, quality security film lasts 10-20 years.

